The following post outlines how I managed to get a wallpaper compiled out of my top 50 artists at last.fm that changes automatically every hour. To achieve that I used the last.fm cover art website, Automator and the Unix utility cron.

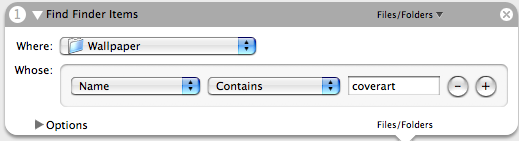
  1. Open Automator and start a new workflow. First thing we have to make sure is that the old wallpaper gets deleted. You wouldn’t want your harddisk fill up with wallpapers. So drag the “Find Finder Items” action from the Finder Library to the workflow and set it up as showed in the picture. (Wallpaper is a folder in my Pictures folder that holds all of my background images.)
    Find Finder Items
  2. Choose the “Move to Trash” Action from the Finder Library and drag it under the previous Action.
  3. Next we have to get the desired wallpaper from the previously mentioned page. First go there and set up the wallpaper just as you like it. Make sure the “Randomise” checkbox is checked, otherwise it wouldn’t make much sense to reload the image every hour, would it? 😉
    When you’re done setting up your image click on “Image Me” and wait for the picture to appear, then copy the address from the address bar of your browser.
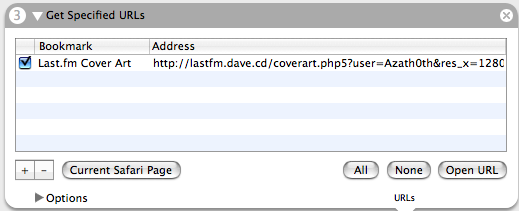
    Back in Automator choose the Safari Library and drag the “Get specified URLs” Action to the workflow. Paste the just copied address into the “Address” field in the Action. (Or if you did this with Safari and got the page still open, just click the “Current Safari Page” button)
    Get Specified URLs
  4. To save the image in the right folder we need the “Download URLs” Action from the Safari Library and specify the folder we chose previously in the delete step.
    Download URLS
  5. In the following two steps of the workflow the file is renamed with date and seconds till midnight, so it has a different filename each time it gets downloaded. Otherwise OS X wouldn’t change the wallpaper even if the image changed.
    Rename
  6. The last Action is Finder’s “Set the Desktop Picture” which you just have to drag into the workflow and you’re done.
  7. Save the workflow as Application into your Applocations folder and remember the name. (I named mine “last.fm – Azath0th – Wallpaper”). Now comes the scary part – the Terminal 😉
  8. We have to set up a cronjob. In order to do that type in crontab -e and paste the following in the crontab file.
    SHELL=/bin/bash
    0 * * * * /usr/bin/open "/Applications/last.fm - Azath0th - Wallpaper.app"

    Of course you have to substitute the name of the program with yours.
    This executes the Automator workflow every hour at 0 minutes on every possible day. (0 * * * *)

That’s it!
A few words of caution though:

Be sure that your desired download folder doesn’t contain any other files that contain “coverart” in their filename or Automator will delete those as well.

When the workflow runs it forces itself into the foreground which can be a bit annoying sometimes. I’m not sure what happens if you’re in the middle of a presentation and the workflow kicks in, it might be better to deactivate it during those occasions by putting a hash caracter (#) in front of the call in the crontab file.

Enjoy it and please tell me if you’ve got any ideas to improve the whole thing.

In case anybody needs to quickly publish DB contents as RSS feed, you can now use my SRSSS – Simple RSS Script 🙂
Nothing sophisticated but should serve a valid RSS 2.0 feed. Just fill in the setup vars on the top, construct your SQL query and make sure you’ve got the right values in the while-loop.

Download here -> SRRS

Following up to my post from yesterday, I found another funny last.fm calculation, the AEP Calculator.

You just type in your username and based on the top 50 artists in your profile, it will tell you how diverse your music taste is. If you are over 4 you’re very diverse, under 0 means you’re kind of obsessive about your top artists.
See the site for more information on how this index is calculated.

My my AEP

Yesterday I finally set up my good old iBook as juke box. It now sits on a shelf besides my working table and runs iTunes fullscreen wirelessly connected to the net and the stereo via my AirpotExpress. It’s working perfectly and I am really satisfied with it. The only downside was, that when I wanted to control anything on the iBook I had to reach over there.

I evaluated several different utilities for remote control but wasn’t really satisfied with any of them, then I remembered about Synergy. What it does is best quoted from it’s page:

Synergy lets you easily share a single mouse and keyboard between multiple computers with different operating systems without special hardware. It’s intended for users with multiple computers on their desk since each system uses its own display.

That’s exactly what I was going for and luckily setup was really easy (instructions for Mac OS X).

  1. Download Synergy from Sourceforge.net
  2. Unzip the archive and copy the resulting folder wherever you want (“Applications” might be a good idea 😉 )
  3. Decide on your “Server” (= the computer who’s keyboard and mouse will control all the other machines). On this machine you need to make a file named synergy.conf with the following contents
    section: screens
    screen1:
    screen2:
    end
    section: links
    screen1:
    left = screen2
    screen2:
    right = screen1
    end

    Substitute screen1 and screen2 with the hostnames of your computers (just punch in hostname in your Terminal and find out). Note that there is no implicit logic in the config file about the placement of the screens. So you have to tell Synergy that screen1 is right of screen2 and the opposite or you won’t be able to leave one of the screens with your mouse.
    The provided sample config is pretty well documented so you should be able to figure out the appropriate positioning for your particular set up very easily.
  4. When you’re done with the config, all there’s left to do is start Synergy. Just execute the following in your Terminal.
    First on the Server (alter the program path to match your system):
    /Applications/Synergy/synergys -c synergy.conf
    and then the client(s):
    /Applications/Synergy/synergyc screen1
    again substitute screen1 with the hostname of your server

If you didn’t make any mistakes in the config file you should be up and running by now and be able to move freely between all of your screens no matter to what machine they are connected.

The best thing about Synergy is that it is cross platform compatible, meaning you can connect Windows, Linux and Mac machines in a similar manner. To know more about the program consult the documentation provided in the installation directory.

UPDATE:
For the lazy, there is even a Mac OS X GUI Programm to do the configuring: SynergyKM 😉