To be precise, we are talking about the “readline Emacs editing mode” keyboard shortcuts. They work in a wide variety of CLI tools, notably your bash or zsh shell. What most people don’t know is, they also work on macOS (née OS X) in any text input field.
Continue reading
Tag: commandline
My Bash configuration
Update: You can now find all of my .dotfiles on GitHub.
Find below my “.bash_profile" file in OS X Lion and the referenced “.bash_ps1" (slightly modified from lifehacker).
Detailed walkthrough
- add some additional directories to PATH
- reference .bash_ps1 (see the file below)
- set grep and ls to display some fancy colors
- two aliases to often used commands
- order top by CPU usage
- display more human readable directory listing output
- Set Textmate’s “mate” command as the default editor
- Ignore duplicates in history. E. g. if I issue “ls” multiple times, it only occurs once when I press the cursor up key, to cycle through my last commands.
- Export DISPLAY environment variable if it’s not already set. This helps with X-forwarding from remote systems.
- SSH host completion lets me type the first few characters of any host I already connected to successfully and completes it just like normal shell commands or files after pressing TAB.
- The “myip” function lets me look up my external IP.
- “git_stats” spits out detailed infos about any git repository you issue this command in.
.bash_profile
export PATH=$PATH:~/bin:/usr/local/bin:/usr/local/sbin:/usr/local/git/bin

# set fancy prompt
if [ -f "$HOME/.bash_ps1" ]; then
    . "$HOME/.bash_ps1"
fi

# some settings to be more colorful
export GREP_OPTIONS='--color=auto' GREP_COLOR='1;32'
export CLICOLOR=true
export LSCOLORS=ExGxFxdxCxDxDxBxBxExEx

# handy aliases
alias top='top -o cpu'
alias ll='ls -lh'

# use Textmate as default editor
export EDITOR="mate"

# no duplicates in bash history
export HISTCONTROL=ignoredups

# export DISPLAY if it's not set yet
[[ -z $DISPLAY ]] && export DISPLAY=":0.0"

# ssh host tab completion
complete -W "$(echo `cat ~/.ssh/known_hosts | cut -f 1 -d ' ' | sed -e s/,.*//g | uniq | grep -v "\["`;)" ssh

################################################
# bash functions
################################################
function myip {
  res=$(curl -s checkip.dyndns.org | grep -Eo '[0-9\.]+')
  echo "$res"
}

function git_stats {
# awesome work from https://github.com/esc/git-stats
# including some modifications
if [ -n "$(git symbolic-ref HEAD 2> /dev/null)" ]; then
    echo "Number of commits per author:"
    git --no-pager shortlog -sn --all
    AUTHORS=$( git shortlog -sn --all | cut -f2 | cut -f1 -d' ')
    LOGOPTS=""
    if [ "$1" == '-w' ]; then
        LOGOPTS="$LOGOPTS -w"
        shift
    fi
    if [ "$1" == '-M' ]; then
        LOGOPTS="$LOGOPTS -M"
        shift
    fi
    if [ "$1" == '-C' ]; then
        LOGOPTS="$LOGOPTS -C --find-copies-harder"
        shift
    fi
    for a in $AUTHORS
    do
        echo '-------------------'
        echo "Statistics for: $a"
        echo -n "Number of files changed: "
        git log $LOGOPTS --all --numstat --format="%n" --author=$a | cut -f3 | sort -iu | wc -l
        echo -n "Number of lines added: "
        git log $LOGOPTS --all --numstat --format="%n" --author=$a | cut -f1 | awk '{s+=$1} END {print s}'
        echo -n "Number of lines deleted: "
        git log $LOGOPTS --all --numstat --format="%n" --author=$a | cut -f2 | awk '{s+=$1} END {print s}'
        echo -n "Number of merges: "
        git log $LOGOPTS --all --merges --author=$a | grep -c '^commit'
    done
else
    echo "you're currently not in a git repository"
fi
}
.bash_ps
############################################
# Modified from emilis bash prompt script
# from https://github.com/emilis/emilis-config/blob/master/.bash_ps1
###########################################
fill="--- "
reset_style='\[\033[00m\]'
status_style=$reset_style'\[\033[0;90m\]' # gray color; use 0;37m for lighter color
prompt_style=$reset_style
command_style=$reset_style'\[\033[1;29m\]' # bold black
PS1="$status_style"'$fill \t\n'"$prompt_style"'${debian_chroot:+($debian_chroot)}\[\033[0;32m\]::>'"$command_style "
# this is invoked every time before a command is executed
trap 'echo -ne "\033[00m"' DEBUG

function prompt_command {
    let fillsize=${COLUMNS}-9
    fill=""
    while [ "$fillsize" -gt "0" ]
        do
            fill="-${fill}" # fill with underscores to work on
            let fillsize=${fillsize}-1
        done
}
export PROMPT_COMMAND=prompt_command
GoAccess – Visual Apache Log Analyzer
Description
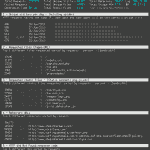
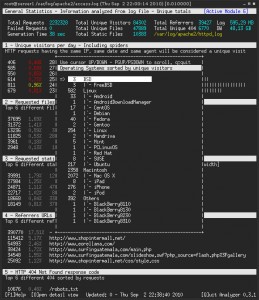
GoAccess is a very handy tool, that runs in the terminal on most *nix Systems (e.g. Linux, Mac OS X, BSD etc.) and displays relatime data gathered from Apache’s access logfile.
It offers a very structured display with different “modules” that break down the parsed access.log data into sections:
- General Statistics – Information analyzed from log file – Unique totals
- Unique visitors per day – Including spiders
- Requested files (Page-URL)
- Requested static files (images, stylesheets etc.)
- Referrer URLs
- HTTP 404 Not Found response code
- Operating Systems
- Browsers
- Hosts
- HTTP Status Codes
- Top Referring Sites
- Top key phrases used on Google
Each module has a detail view that can be opened by pressing “o”. The detail view gives you a scrollable list with more information on the currently selected data.
Installation
Since I couldn’t find a package for GoAccess in Debian lenny’s apt sources, I took the manual compile route. But the installation is still really easy and fast.
- Make sure you’ve got the GLIB2, ncurses & GeoIP packages installed.
aptitude install libglib2.0-dev, libncurses5-dev, libgeoip-dev
- Download the latest GoAccess tarball from http://goaccess.prosoftcorp.com/download and uncompress it on your webserver.
At the time of writing the current version was GoAccess 0.3.3. - Go into the newly created folder where the uncompressed files are and type “./configure”
(include the dot and slash before the command!) - If all tests pass, you should see those three lines at the end of the output:
config.status: creating Makefile
config.status: creating config.h
config.status: executing depfiles commands
- Type “make” to start the compile process.
- When the program is readily compiled, it is time to install the binaries on your system.
For that gain root access (or use “sudo”) and type “make install“.
Running GoAccess
Once you are done installing you can start the program by typing in “goaccess” on the command prompt and pressing enter. If you don’t add any command line options, GoAccess will print a few lines of help text.
GoAccess - 0.3.3

Usage: goaccess [ -b ][ -s ][ -e IP_ADDRESS][ -f log_file ]

The following options can also be supplied to the command:

  -f  - Path to input log
  -b  - Enable total bandwidth consumption. To achieve
        faster parsing, do not enable this flag.
  -s  - Enable/report HTTP status codes. To avoid overhead
        while parsing, this has been disabled by default.
  -e  - Exclude an IP from being counted under the HOST
        module. This has been disabled by default.

For more details visit: http://goaccess.prosoftcorp.com
If you want all the features you can start it with:
goaccess -b -s -f /var/log/apache/access.log
Give it some time to parse the logfile (could take a very long time, depending on your logfile size), then you should see the mainscreen with live updating data and can start to use GoAccess.
Colorful grep
grep is a useful little *nix command line utility that makes it easy to search for strings in files. The real beauty comes when you start using it with pipes. One thing that kind of bothered me since I started using it, that it didn’t highlight the string you where searching for in it’s output.
Turns out, this can be accomplished very easily (should really just have reade the man page 😉 ).
Put the following in your shell startup script (/home/flo/.bashrc in my case)
export GREP_OPTIONS='--color=auto'
Now that was simple wasn’t it (though you’ll have to re-log in to make it work or at least spawn another shell process, so the startup file gets sourced) 🙂
But now if you followed my tip and started using pipes like mad, after applying this tip, you’ll quickly encounter that the colors are gone again. To hand over colors to say the often used less program you have to make an alias that hands grep the --color=always option (don’t put this in GREP_OPTIONS it tends to break things!) and call less with the -R option.
Or simpler, just add the following to your shell startup script:
export LESS=-R

alias cgrep='grep --color=always'


