I thought I’d post a little howto on how I try to keep the data on the hard drive of my little iBook save. So without further ado… here it is:
- This steps actually involves leaving your beloved home. Beware it might be very bright and sunny outside! What you are after is an external hard drive of similar or preferably greater size than your internal HD. In my case I bought a 250GB drive savely kept in an external case which has one USB 2.0 & two FireWire ports. FireWire was particularly important for me, because of the Mac’s capability to boot from FireWire drives but more on that later.
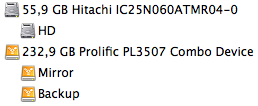 Next I partitioned the hard drive (using HFS+ for maximum compatibility under OS X) with one partition serving as the mirror for my internal 60GB disk. The rest of the disk is used as backup space for other data, right now we’ll only care about the mirror drive.
- My main goal was to get a fully functional clone of my internal disk, so in the event of a disaster, if my drive crashed I could just plug in the external mirror, boot it and work on as usual. After a little bit of searching, the best tool I found for cloning disks on the Mac is CarbonCopyCloner. So I made a clone of my internal disk to the mirror partition checking the “Make bootable” option in CCC’s preferences.
- After the clone operation finished I tested the mirror by choosing
 it as the startup disk in Mac OS X’s System Preferences and restarting the OS. It started up perfectly and I had the exact same system in front of me, except for the fact that it was running off the external FireWire drive and the internal disk was completely powered down.
 - Now that I had my working mirror savely stored at home in case of disasters, I only needed a solution to keep it up to date.
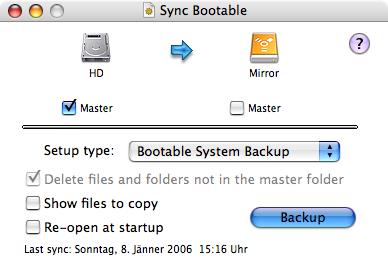
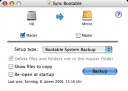 Again Google was my friend and after a few searches I came up with Synchonize! Pro X which has loads of options for possibly every synching need you might have or develop in the future. At the moment I’m just using the “Bootable System Backup” option to synch my internal disk with the external one.
 - Never forget to test your backups! About every second or third sync I invest a few minutes of my valuable time to restart my iBook from the external drive to make sure the backup disk is working as desired.
 Next I partitioned the hard drive (using HFS+ for maximum compatibility under OS X) with one partition serving as the mirror for my internal 60GB disk. The rest of the disk is used as backup space for other data, right now we’ll only care about the mirror drive.
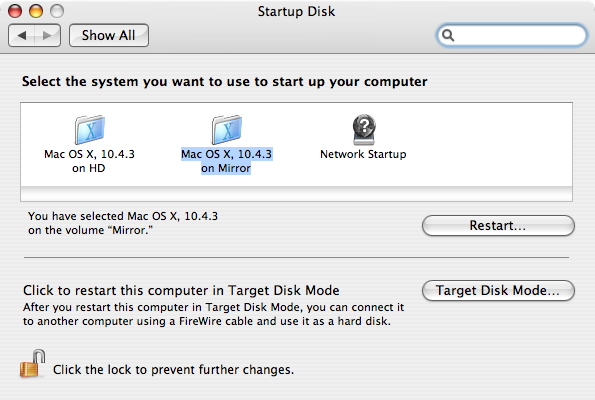
I know it might not be perfect to do this just “whenever I think of it” (which is currently about twice a week) but it is still far more effective than my previous non-backup strategy which I kept running for over one year. Especially considered that I’m using my iBook on the road (at uni, at work etc.), always carriyng it around in my backpack which exposes it to the high risk of being damaged easily. With my current solutin my data is safe and I could even go to any arbitrary Mac, plug in the external drive, reboot and have my usual working environment running on the system.
edit: I know I could have maybe used Synchronize! X Pro for the entire progress of cloning and synching my hard drive. The reason I chose the detour over CCC was that I initially wanted to choose this programm for the synching as well but encountered that it was painfully slow and not as easy a one-click-solution as Synchronize! X Pro.